Spaces:
No application file
No application file
File size: 3,385 Bytes
8c9aa54 d99ab5a 0c36ee9 d99ab5a 0c36ee9 d99ab5a 0c36ee9 d99ab5a 0c36ee9 d99ab5a 0c36ee9 d99ab5a 0c36ee9 d99ab5a 0c36ee9 d99ab5a 0c36ee9 d99ab5a 0c36ee9 d99ab5a |
1 2 3 4 5 6 7 8 9 10 11 12 13 14 15 16 17 18 19 20 21 22 23 24 25 26 27 28 29 30 31 32 33 34 35 36 37 38 39 40 41 42 43 44 45 46 47 48 49 50 51 52 53 54 55 56 57 58 59 60 61 62 63 64 65 66 67 68 69 70 71 72 73 74 75 76 77 78 79 80 81 82 83 84 85 86 87 88 89 90 91 92 93 94 95 96 97 98 99 100 101 102 103 104 105 106 107 108 109 |
---
title: Learning Google Cloud With Real Projects
emoji: 🏃
colorFrom: indigo
colorTo: blue
sdk: docker
pinned: false
---
# <h1 align="center"><font color="pink">App para determinar dados Meteorológicos</font></h1>
#### <font color="yellow">Data Scientist.: Dr. Eddy Giusepe Chirinos Isidro</font>
# <font color="pink">Usando Dockerfile</font>
Temos dois `Dockerfiles`, os quais você deve muda de nome para executar eles, assim:
* Dockerfile_FastAPI $-->$ `Dockerfile`
* Dockerfile_Flask $-->$ `Dockerfile`
Para a Dockerização aplicamos os seguintes comandos:
```
$ docker build -t app_fastapi:1.0 .
$ docker run -d -p 8080:8080 --name app_fastapi_container app_fastapi:1.0 (Em segundo Plano)
ou
$ docker run -p 8080:8080 --name app_fastapi_container app_fastapi:1.0
```
# <font color="pink">Usando docker-compose</font>
Nesta parte você deve criar um arquivo `docker-compose.yml` que fará o trabalho de chamar a seu arquivo `Dockerfile`. Agora vamos a instanciar a nossa aplicação usando `docker-compose`, para isso usamos os seguintes comandos:
```
$ docker-compose build
$ docker-compose up -d | $ docker-compose up
$ docker-compose down
```
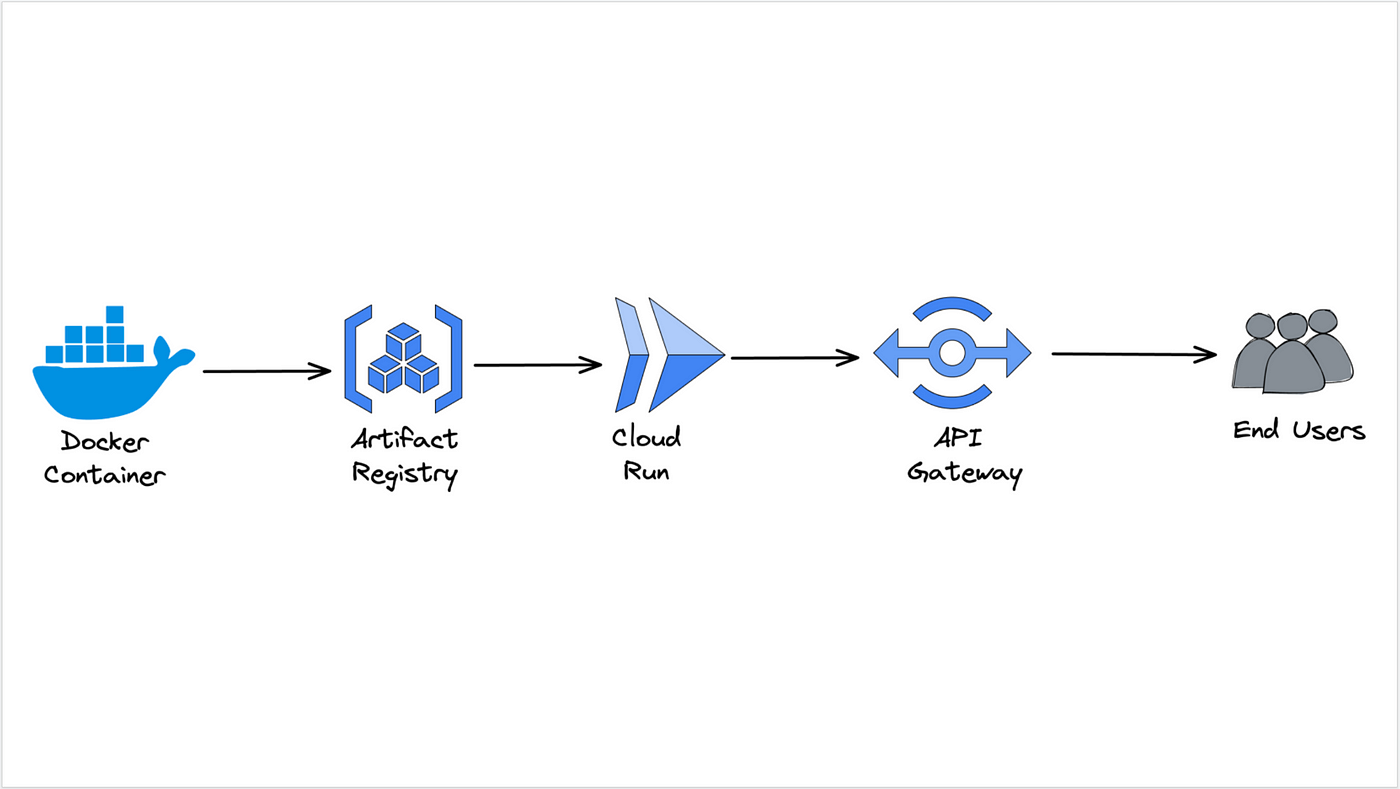
# <font color="gree">Usando Docker e Cloud Run na Google Cloud Platform (GCP)</font>
A seguir vamos a realizar o `Deploy` da nossa Aplicação na `Google Cloud Platform` (GCP.)
* Construímos a nossa Imagem lá no `cloudshel`:
```
$ docker build -t app_fastapi:1.0 .
```

* Seguidamente adicionamos uma `tag` e passamos o caminho que tem a seguinte estrutura: `nome_da_região/id_projeto/nome_do_repositório/nome_qualquer_para_sua_imagem`. Eu chamarei a minha imagem (o final do caminho) com o mesmo nome que testei localmente (`app_fastapi:1.0`). Na linha de comando ficaria, assim:
```
$ docker tag 11b1ad51c754 us-central1-docker.pkg.dev/first-eddy-deploy-ner/eddy-deploy-weather-1/app_fastapi:1.0
```
Repara que a `tag` é o ID da imagem criada anteriormente.

Não esqueça criar, antes, o seu `repositório` para assim pegar depois o path dele:


* Logo, realizamos o `push` da Imagem para o nosso repositório:
```
$ docker push us-central1-docker.pkg.dev/first-eddy-deploy-ner/eddy-deploy-weather-1/app_fastapi:1.0
```

Você pode verificar que a sua imagem foi enviada a seu `repositório` no `Artifact Registry`:


<font color="orange">Entrando no `Artifact Registry`, podemos realizar o `Deploy` da nossa App. Fazemos click e selecionamos `Implementar em Cloud Run`, assim:</font>

Thanks God! |